
Your SSD drive will need >27GB free space on C: to upgrade from Windows 7 to Windows 8, here's some clean-up tips

Windows 8 system requirements listed here (and above) include the big gotcha: at least 20GB free disk space is required on your C: drive for 64 bit upgrade installs. This is likely to still be the case with the RTM (arriving August 15th).
If you have a workstation-caliber laptop, like my vZilla and its 128GB mSATA SSD, you may find keeping things like a 16GB hibernate file on a 128GB C: drive a challenge. Staying short of only 10% free space at all times is also a good idea, so you really need more like 25GB for a bit of extra margin, and avoiding potential SSD performance impacts. Especially important on older, non-TRIM enabled SSDs.
So, here's some methods to get some empty space back, in increasing order of aggressiveness/desperation. If you are uncomfortable doing these actions, you shouldn't be doing them! Let's face it, this site is largely for intermediate and advanced users, but the first two are the easiest, safest, and also likely have the biggest impact in free space.
1) Start with clicking Start, then typing "Disk Cleanup" then pressing enter
That's the easy one, just follow the wizard.
2) Nuke that big hibernation file properly
You can use Microsoft's fixit wizard, downloadable from Microsoft here, but note that this will disable the Fast Startup / Hybrid Boot feature.
OR
- Open a command prompt with administrative privileges.
- Enter
powercfg.exe -h off - Exit the command prompt.
If you got 16GB of RAM, well, you now have 16GB more free disk space on your C: drive. That's right, no reboot required, immediate benefit (if you don't need hibernate functions). Unfortunately, if you choose a power profile that uses hibernate (such as suspend when inactive for 15 minutes, and hibernate after 8 hours), then the hibernate file will come back again.
Source: www.techrepublic.com/blog/itdojo/delete-hiberfilsys-by-disabling-windows-hibernate-function/1493
3) Change swap to 2GB
If you have 8GB or greater in your system, letting Windows manage the size of your swap file gets silly, with double the RAM.
Go ahead and reduce your swap file space, 4GB should be plenty, because if your hitting the swap file that hard, you're really in trouble as far as speed. Control Panel > System > Advanced system settings > Advanced > Performance > Settings... > Advanced > Virtual Memory > Change... >

4) Consider moving the My Documents and other user folders
If you have a D: drive to move them too, and your D: drive isn't so slow you'll regret it:
www.sevenforums.com/tutorials/18629-user-folders-change-default-location.html
5) Manually delete all files (that are dated older than your last reboot) in the temp directory
- paste this line into your Start, Search (or Run) box:
shell:UsersFilesFolder\AppData\Local\Temp - sort the resulting file/folder view by date
- select everything (files and folders) older than your last reboot (to avoid trying to delete currently in-use temp files)
- right-click, select Properties, to determine how much disk space you're about to recover (for some reason, I find Step #1 above often leaves a lot of files here!)
- hit the Del key while holding down Shift to permanently delete the selected files and folders immediately, avoiding the Recycle Bin entirely
6) If you use iTunes to do local backups of your iOS device, move them off your C: drive
Those backups can be quite large, and are on your C: drive by default, even if you installed iTunes itself to something other than your D: drive!
- Read all about exactly how to do this here.
- In my case, seen in this video below, I free up 18GB of space on my 128GB SSD, by moving my backup of up my 64GB iPhone 5:
7) If you really are desperate (and have a full backup)
You can start working your way down the list here: helpful.knobs-dials.com/index.php/Making_your_windows_installation_smaller
8) Clean-up (after you make the move to Windows 8)
Once you're done upgrading, remember to completely backup your system, then remove that Windows.old folder.
I had 27GB of unused C: drive space when I started my install, then had only 2GB when done:

So nuking that Previous Windows installation was certainly critical for me, since mine was 22.1GB (pictured below):


Please comment below, to let us all know how your pre-Windows 8 upgrade cleaning goes! And don't forget to do a full Windows 7 image backup before attempting upgrades (I'd never trust roll-backs of such major upgrades gone wrong).
Aug 17 2012 Update:
My testing with the RTM/GA code shows that you actually need 27GB available!
Feb 01 2013 Update:
I've found that if you use Lotus Notes, you may want to check out this subdirectory below where you have Notes installed, and nuke some old, mysterious huge DMP files: /Notes/Data/workspace/logs

And in case you didn't notice, over time Windows Update Cleanup can get pretty large too:

Jun 11 2013 Update:
There's also that Windows.edb file that Windows uses for Windows Search (Indexing), that can tend to grow out of control, you can check out its size and/or delete or rebuild it, more info here.
Sep 10 2013 Update:
Seems that Windows 8.1 (now RTM) has slightly lower requirements for space, for doing an upgrade, discussed here and here. The minimums for the Windows 8.1 preview are over here.
I haven't yet located a similar document for the RTM (that'll become GA in October). My own upgrade of a Lenovo ThinkPad W520, from Windows 8 Pro 64 bit to Windows 8.1 Pro 64 bit, went fine, discussed here. Since my entire system is backed up daily using Windows Server 2012 Essentials, I have an easy way to roll-back in time, should I wish to. No need to take up precious SSD C: drive space for those files. So be sure to run the disk cleanup wizard after the upgrade, because there's some MAJOR gains to be had (see screenshot below, that's ~9GB!). Paul Thurrott even talks about how hard it's become to find the Disk Cleanup utility in this excellent read at winsupersite's Hands-On with Windows 8.1: The Windows 7 Upgrade, Step from the past into the future, Jul 17 2013 and his Windows.old discussion here.

Oct 12 2013 Update:
If you're desperate to free up a bit more space on that Windows 7 SP1 system you'd like to upgrade, see the new hotfix info, Microsoft rolls out a new hotfix for Windows 7 Service Pack 1, by Mary Jo Foley on Oct 09 2013 .
Aug 02 2014 Update:
I use WizTree for very quick and easy identification of huge files. I don't mind the lack of a pie chart, and the display instantly updates as you clean up, seen below. Related discussion here.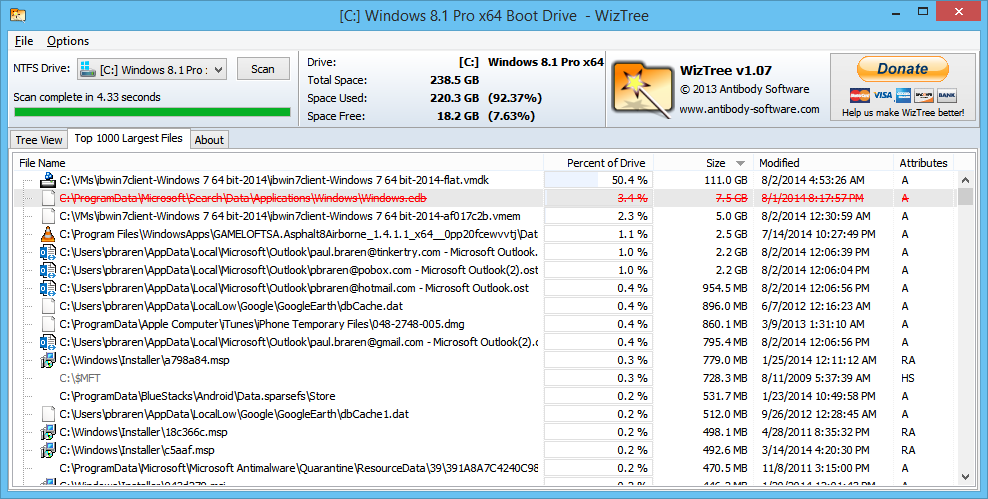
Aug 14 2014 Update:
If you use remote Desktop, you may have had bitmap caching on at some point, and this directly can get large. It's safe to delete all the files, in this directory.
C:\Users\_yourusername_\AppData\Local\Microsoft\Outlook\Microsoft\Terminal Server Client\Cache


